The main reason that some models require more attention to continuity, primarily, is because it will show when manufactured.
The foundation of a quality surface starts with making curves that can create cleaner, simpler surfaces with good continuity. CurvatureGraph, Zebra, and CurvatureAnalysis are the tools we can use to make sure we set things up for the best results.
On this Rhino 5 Level 2 page 131 Exercise 28, the procedure to build quality surface is prescribed in these steps:
Step 1: To evaluate the curves
1 Select the curves in the example file provided by McNeal and start the CurvatureGraph command. The graph tells us that both curves are tangent continuous but have curvature discontinuities in a couple of locations.

The graph tells us that both curves are tangent continuous but have curvature discontinuities in a couple of locations. Assuming we want the surfaces we build from these curves to have curvature continuity throughout, we will be better off modifying these curves before creating the surfaces.
Building a surface that has consistent curvature as a single surface is good modeling practice. The idea is that we need to decide first the surface arrangement, then that will help us understand how to draw clean new curves.
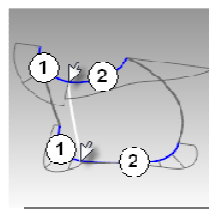
Looking at the bottom curve, we can see two areas that are good candidates for creating the surfaces, so we will start there. There is an area of high curvature at the front (1) and a relatively flat stretch in the
middle with a rapidly increasing curvature at the handle side (2). The top curve is smoother overall, but has similar corresponding regions of curvature. By examining the current curves, we can identify two curves to build at the top and bottom. The white vertical curve intersects the top and bottom curves at the curvature discontinuity of the top curve, which is a modified circle, and on an abrupt change in curvature on the lower curve. This intersection is where we will start and end our modified curves.
Step 2: To build the modified curves

1 Using the current curves as a reference, draw four new curves of degree five with six points. The goal is to redraw the top and bottom curves in two parts each. Keep in mind what you know about continuity,
CurvatureGraph, tangent directions, and EndBulge. Try to keep the control point locations even and progressive.

2 Analyze your curves with the CurvatureGraph command. Try to get the graph clean with minimal, abrupt changes, while at the same time match the original curve shapes as closely as possible. They cannot be exactly the same as the originals if they are to have better continuity, but it should be possible to get close.
Step 3: To make the surfaces for the bottle from edge curves There are four, single-span, curves that define each area for the surfaces. In this part of the exercise we will use the EdgeSrf command (Surface menu: Edge curves) to create the surfaces. This command is one that uses the input curve structure to create the surface. It works best if the curves on opposite sides of the rectangle match each other. The
resulting surface will be simpler. Since we have taken care to meet this criterion, all of the vertical curves are degree 3 with four points, and the curves we just made are degree five with six points, the resulting surfaces will share this structure.

1 Select four curves that define one of the surfaces.
2 Start the EdgeSrf command (Surface menu: Edge curves).
3 Repeat steps 1 and 2 for the other surface.
4 Check the surfaces with the Zebra command.

The zebra stripes have a nice even flow but the surfaces are clearly not tangent at the vertical edge

Step 4: To match the surfaces for the bottle with MatchSrf
1 Use the MatchSrf command (Surface menu: Surface Edit Tools > Match) to match the surfaces for Curvature. Try matching in both directions, and with or without Average surfaces set.
2 Check the surfaces with the Zebra command.
The zebra stripes have a nice even flow with no discontinuity at the common edge.
Conclusion
Although in the training manual it does not state clearly how to make Step 2-1. work , the way to make it work is draw four new curves of degree five with six points.
MatchSrf is a useful command in blending two surface with continuity.
Matching the larger surface to the smaller one, without Average, results in a more erratic control point arrangement on the larger surface than any other combination, particularly the second row from the top.
Other considerations being equal, the best choice is the surface with the most regular, even control point arrangement.
Other considerations being equal, the best choice is the surface with the most regular, even control point arrangement.
No comments:
Post a Comment